To ensure success in any operation or project, a set of guidelines must be decided for the team to refer to. Similarly, when it comes to software testing, quality assurance teams must choose from a set of software testing methodologies to meet their testing goals and objectives while ensuring the project succeeds.

What is a Software Testing Methodology?

A software testing methodology is a set of procedures, guidelines, and standards to ensure that software products meet the expected quality and performance standards. It is a framework for organizing, planning, and executing the different types of software testing activities.

The importance of software testing methodologies lies in their ability to provide a structured approach to software testing, ensuring that testing is comprehensive, efficient, and effective. They help minimize the risk of defects and errors in the software by identifying them early in the development lifecycle, thereby reducing the cost and time required for defect resolution. 

Additionally, a well-defined software testing methodology helps establish clear communication and collaboration between the development team, testing team, and other stakeholders, promoting a quality and continuous improvement culture.

The Major Types of Software Testing Methodologies

Depending on the situation and requirements, an organization can implement any methodology for software testing. Here are three standard methodologies one can choose from.

The Waterfall model

A linear and sequential approach, the Waterfall model divides the testing process into distinct phases, each of which must be completed before proceeding to the next phase. It provides a structured, step-by-step approach that ensures that all essential aspects of testing are considered and addressed. The model also provides clear phases and deliverables, making managing the testing process and tracking progress easier.

This model follows the processes in this sequence:

  1. Requirements Gathering: The first testing phase involves gathering requirements and defining objectives and acceptance criteria. This helps ensure that the testing process is aligned with the project’s overall goals, which is also one of the best practices in test automation.
  2. Planning: In this phase, the testing strategy is developed, including the types of tests to be performed, the testing environment, and the resources required. A test plan is also developed, which outlines the scope of the testing, the testing schedule, and the responsibilities of the testing team.
  3. Design: the test cases and scenarios are designed in this phase. This includes defining the test data, the load profiles, and the expected performance results. The testing environment is also configured, and the test tools are selected.
  4. Implementation: the tests are executed, and results are recorded. The testing environment is monitored to ensure the test conditions are consistent and the results are accurate.
  5. Analysis: test results are analyzed to determine if the system meets the objectives. The results are compared against the acceptance criteria, and any performance bottlenecks or issues are identified.
  6. Reporting: includes the test results, the analysis, and any recommendations for performance improvements. The results are reviewed with the stakeholders, and any necessary changes are made.
  7. Maintenance: test results are maintained and updated to remain relevant and accurate. This includes updating the test data, load profiles, and expected results as needed.

Pros and Cons of the Waterfall Model

Pros:
  • Well-defined phases and deliverables can lead to better planning and control
  • Provides a clear understanding of project requirements and scope
  • Enables better documentation and traceability
  • Works well for small, well-defined projects with minimal changes
  • Provides a stable foundation for testing
Cons:
  • Limited flexibility to accommodate changes in requirements or priorities
  • Lack of customer involvement and feedback
  • Late detection and resolution of defects may lead to delays and increased costs
  • Tends to focus on following the plan rather than adapting to changing circumstances
  • Can result in over-reliance on documentation and a lack of focus on the final product

The Agile model

Unlike the Waterfall Model, the Agile model is flexible and iterative software development. It allows for continuous development and delivery of working software through short iterations, called sprints.

With the Agile Model, testers can get frequent feedback and iteration, enabling the team to quickly make changes and improve the system’s performance. This approach sits well with projects that need frequent and rapid changes due to fluctuations in requirements, such as software performance testing. It is most commonly adopted by testing teams that must work closely with the development team.

The key features of the Agile Model for testing include

  1. Continuous Testing: testing is performed throughout the development process rather than at the end. This allows for early detection and resolution of performance issues and reduces the risk of late-stage surprises.
  2. Collaboration: there is a heavy emphasis on collaboration between the development and testing teams, enabling them to work together to optimize performance. This includes regular meetings, called stand-ups, where the team reviews progress and identifies any issues that need to be addressed.
  3. Adaptability: since the Agile model is designed to be flexible and adaptable, requirements and priorities change as needed. This helps ensure the testing process aligns with the project’s goals.
  4. Incremental Delivery: delivery of working software in short iterations is enabled, allowing the testing team to see progress and provide feedback regularly. 

Pros and Cons of the Agile Model

Pros:
  • Emphasis on customer satisfaction through continuous delivery of working software
  • Flexibility to accommodate changes in requirements or priorities
  • Promotes teamwork and collaboration among team members
  • Allows for early detection and resolution of defects
  • Provides regular opportunities for feedback and improvement
Cons:
  • Lack of documentation can lead to confusion and misunderstandings
  • Requires active participation and involvement from all team members
  • May result in incomplete or inadequate testing if not properly managed
  • Relies heavily on communication and may lead to misinterpretation if communication is poor
  • Can be challenging to implement in larger organizations

The DevOps model

DevOps aims to improve software delivery’s speed, quality, and reliability. As such, the DevOps Model emphasizes collaboration and communication between the development, operations, and testing teams. 

In this model, testing is integrated into the overall software development process and is performed continuously throughout the development lifecycle. This assists in the early detection and resolution of performance issues, reducing the risk of late-stage surprises and improving the overall quality of the software.

The key features of the DevOps Model for testing include

  1. Continuous Integration: testing is done continuously as code changes are made, especially in parallel testing.
  2. Automation: this model emphasizes automation, including the automation of testing. This enables the testing team to run tests quickly and repeatedly and to identify and resolve issues rapidly.
  3. Collaboration: collaboration and constant communication are core components of the DevOps model. This help integrates testing into the software development lifecycle and optimizes performance.
  4. Continuous Delivery: since the teams are working closely, faster and performance-optimized software delivery is enabled with this model. The operations team can thus easily ensure that the testing objectives are met.

Pros and Cons of the DevOps Model

Pros:
  • Continuous integration and delivery lead to faster delivery of software
  • Emphasis on automation and collaboration leads to increased efficiency
  • Early detection and resolution of defects through continuous testing
  • Improved communication and collaboration among teams
  • Enables faster response to changing requirements or priorities
Cons:
  • Can be challenging to implement in traditional organizations with siloed teams
  • Requires a significant investment in tools and infrastructure
  • May result in increased workload and pressure on team members
  • May lead to over-reliance on automation and a lack of focus on the final product
  • Requires a cultural shift towards increased collaboration and continuous improvement

How to Choose the Right Software Testing Methodology?

Selecting the most suitable type of software testing methodology rests on factors such as the nature and timeline of the project as well as the requirements of the client. Moreover, it can also depend on whether the software testers wish to wait for a working model of the system or if they want to input early in the development lifecycle. 

For this, it is better to consult a technology solutions provider with expertise in QA, such as VentureDive’s QA services. Besides having in-depth and working knowledge of all aspects of quality assurance, our teams can readily work with different types of testing, making us your reliable partner for QA consulting.

FAQs Related to Software Testing Methodologies

Software testing methodologies are essential because they provide a systematic and structured approach to software testing. They help to ensure that software applications are thoroughly tested for quality, reliability, and functionality. This, in turn, helps to improve the overall quality of software applications and reduce the risk of errors or defects.

Test-driven Development (TDD) is an Agile software development approach involving automated tests before writing code. TDD helps ensure that the code is testable and helps identify and fix issues early in the development process.

Behavior-driven Development (BDD) is a software development methodology emphasizing collaboration and communication between developers, testers, and business stakeholders. BDD focuses on defining the expected behavior of the software application through user stories and then using these stories to drive the development and testing process.

Are you planning to create a top-quality digital solution? Talk to our experts now!

You might also like…

As organizations move from traditional and manual processes towards automation in their processes and tasks, robotic process automation (RPA) testing stands as one of the most promising approaches to test automation. Robotic process automation (RPA) is the use of software to automate human tasks.

What is RPA testing in software testing, and how can software testing organizations benefit from it? We are going to discuss all these points along with the following:

  • RPA testing definition
  • Processes and phases of RPA testing
  • Best practices in RPA Testing
  • Benefits of RPA Testing
  • Challenges of RPA Testing
  • Best RPA testing tools
  • Myths surrounding RPA testing

What is RPA in Software Testing?

Robotic Process Automation (RPA) is a technology that automates repetitive tasks. That said, it is not a replacement for manual testing; instead, it can be used to automate the testing existing applications.

An efficient way to reduce costs and increase productivity, RPA testing involves automating tests that are run against your existing applications, meaning you can eliminate repetitive testing and focus on other aspects of your business. 

What are the three phases of RPA testing?

There are three phases in the RPA lifecycle: Pre-test, test, and post-test. These are explained as follows:

  1. The Pre-Test Phase

The pre-test phase is where you will create your project plan and determine the most appropriate approach for your organization. After this step, it’s time to begin planning out your tests. 

  1. The Test Phase

The test phase involves executing those plans to verify that they work as intended by following best practices and industry standards. 

  1. The Post-Test Phase

Finally, there’s post-testing, where an auditor or reviewer will review your work in detail so that you can be sure it was done right before moving on with another project or commissioning services from other vendors.

How to use RPA testing for test automation?

While RPA is helpful for test automation, it is not just another tool you can add to your toolbox. Instead, RPA is a unique software platform that empowers businesses to automate their processes using robots instead of people.

When applied correctly, this approach will help companies achieve significant time savings and cost reductions while maintaining high-quality standards across all stages of the product lifecycle: design through development and release into production, all the way down through testing (regression).

Understanding the RPA process

The processes involved in RPA testing include

  1. Planning: 

As a first step, the planning process involves defining the objectives, scope, and requirements of the RPA testing. This step also focuses on identifying the test scenarios, test cases, and test data that will be used to test the RPA system.

  1. Test design: 

This process involves designing the test cases and test scenarios that will be used to test the RPA system. The test design process should cover all possible use cases and ensure that the RPA system meets the functional requirements of the business process it is automating.

  1. Test execution: 

Executing test cases and scenarios to verify that the RPA system works as intended. Test execution includes running the software robot in different environments, testing the robot’s ability to handle exceptions, and verifying that the robot is producing the expected outputs.

  1. Defect management: 

In defect management, the testers identify, track, and manage defects and issues discovered during testing. This process also includes recording defects in a defect tracking tool, assigning priorities and severities to defects, and working with the development team to resolve the subsequent defects.

  1. Reporting: 

Generating reports and metrics that provide insights into the effectiveness of the RPA testing is the last step of the overall RPA testing process. Reporting includes documenting the testing results, identifying improvement areas, and communicating the results to stakeholders.

Creating an RPA Testing Framework

An RPA testing framework is a set of guidelines, processes, and tools that provide a structured approach to testing RPA systems. Organizations aware of the best test automation practices make sure to create and implement frameworks for the following reasons.

  1. Consistency and repeatability: ensures that tests are consistent and repeatable across different projects, environments, and teams. This reduces the risk of errors and inconsistencies and ensures that the RPA system is tested thoroughly and accurately.
  2. Scalability: can be scaled to handle testing for large, complex RPA systems, reducing the risk of errors and improving the efficiency of the testing process.
  3. Standardization: provides a standardized approach to testing RPA systems, which helps to ensure that tests are consistent, reliable, and effective.
  4. Faster time-to-market: helps to reduce the time required for testing, which can lead to faster deployment of the RPA system and faster realization of the benefits of automation.
  5. Improved quality: helps to identify and address defects early in the development process, leading to improved quality and fewer defects in the production environment.
  6. Cost savings: can help reduce testing costs by improving efficiency, reducing errors, and enabling earlier identification and resolution of defects.

Using RPA Test Cases for Utmost Efficiency

RPA test cases are a set of predefined scenarios used to verify the functionality, reliability, and efficiency of an RPA system. They help ensure the RPA system works as intended and meets the business requirements. To create compelling RPA test cases, you should start by identifying the essential functions and processes that the robot performs. You should also consider the different types of data and inputs the robot will encounter and any exceptions and errors it may encounter.

Here are some examples of RPA test cases:

Log in and Authentication Test Case: 

Verifies the ability of the RPA system to log in to the required system and authenticate the user. It checks whether the robot correctly enters the user’s credentials, logs in to the system, and verifies that the user is authorized to access the system.

Data Input Test Case: 

Verifies if the RPA system is inputting data correctly into the required system. It checks whether the robot correctly identifies the fields where data needs to be entered correctly, accurately, and consistently.

Exception Handling Test Case: 

Verifies the ability of the RPA system to handle exceptions and errors. It checks whether the robot can identify errors, handle them, and report them correctly.

Output Validation Test Case: 

Verifies the accuracy and completeness of the output produced by the RPA system. It checks whether the robot is producing the expected output and whether the output meets the business requirements.

Integration Test Case: 

Verifies the integration of the RPA system with other systems in the business process. It checks whether the robot transfers data between systems, interacts with other systems correctly, and produces the expected output.

Best practices for RPA testing

To ensure that you get the most out of RPA testing, implement the following best practices. 

  1. Break down the processes before you begin your testing journey to perfect each stage of the procedures. 
  2. Check if the data is usable, as unstructured or wrongly formatted data can lead to accurate results.
  3. Test and examine the scripts before execution so that every step is noticed and completed.
  4. Consider the business impact before opting for robotic automation. You may not necessarily need RPA testing and could do well with other types of automation.
  5. Define your key performance indicators (KPIs), the desired ROI, and whether RPA testing can help you achieve that.
  6. Make sure to combine unattended and attended RPA together.
  7. Instead of automating smaller tasks, look for larger groups and processes, which can bring more significant impacts out of automation.
  8. Create policies to ensure compliance and governance. 
  9. Test the execution of all steps to see if the workflow is yielding results. 
  10. Troubleshoot errors wherever the bot fails to deliver through software performance testing

Benefits of RPA Testing

Implementing RPA testing in your organization can reap tons of benefits, such as the ones listed below.

Increased Efficiency

RPA testing can automate repetitive and time-consuming tasks, freeing up employees to focus on higher-value activities. This can result in increased efficiency and productivity.

Improved Accuracy

RPA bots can perform tasks with high accuracy and consistency, reducing the risk of human errors.

Cost Savings

RPA testing can reduce labor costs and improve process efficiency, resulting in significant cost savings for organizations.

Scalability

RPA bots can be easily scaled up or down to handle changes in workload, allowing organizations to be more agile and responsive.

Improved Compliance

RPA bots can be programmed to follow strict rules and procedures, ensuring compliance with regulatory requirements and reducing the risk of non-compliance.

Faster Processing

RPA bots can process tasks much faster than humans, resulting in faster turnaround times and improved customer satisfaction.

RPA Testing Challenges and Disadvantages

RPA testing can bring many benefits, but there are also some challenges and disadvantages to consider. Here are a few:

Complex Scenarios

RPA testing can be challenging when dealing with complex scenarios, especially when the processes involve multiple systems and data sources.

Dependency on UI

RPA bots are typically designed to mimic human interaction with the user interface, which can make them susceptible to changes in the interface or errors in the UI elements.

Maintenance

Like any software, RPA bots require maintenance and updates, which can be time-consuming and costly.

Non-Standard Applications

RPA testing can be challenging when dealing with non-standard applications that do not have an API or web services interface.

Security

RPA bots can pose security risks, especially if they are not correctly configured or if they are given access to sensitive data. While RPA bots themselves cannot cause cross-site request forgery or cross-site scripting attacks, if they are entering sensitive data into web applications, they can potentially trigger such vulnerabilities.

Reliability

RPA bots may not always perform as expected, especially when dealing with unexpected inputs or errors.

Difference between RPA Testing and Test Automation

AspectTest AutomationRPA Testing
ScopeFocused on software testing processesFocused on automating business processes across multiple applications and systems
Input DataRequires scripted input dataCan operate on unstructured data, such as images and PDFs
DevelopmentTypically developed by specialized testing teamsCan be developed by business analysts or process owners with minimal technical expertise
Test EnvironmentRequires a dedicated testing environment with controlled data and applicationsCan operate in live production environments
IntegrationFocuses on integration between applications and systems in the context of software testingInvolves the integration of multiple applications and systems for end-to-end business processes
MaintenanceScripts require maintenance and updates as the software changesBots are designed to be more adaptable to change and can require less maintenance

RPA Testing Tools – Top Picks & How to Select

Before selecting the tool for your processes, make sure that the RPA testing offers:

  1. Compatibility with the RPA platform being used. Ensure that the tool supports the specific features and capabilities of the RPA platform and can work seamlessly with it.
  2. Ease of use; should be user-friendly and easy to learn and use. It should have a user-friendly interface and support both manual and automated testing.
  3. Integration with other testing tools and systems, such as test management and defect tracking tools.
  4. Scalability to handle testing for large, complex RPA systems. It should be able to handle multiple test cases and tests running simultaneously, hence supporting parallel testing
  5. Flexibility; the RA testing tool should be flexible to allow for customization and support for a wide range of applications and platforms.
  6. Reporting and analytics to provide comprehensive reporting and analytics capabilities to enable a practical analysis of test results and identification of issues.
  7. Support and community, including user groups, online forums, and vendor support. Ensure the vendor provides adequate support, training, and documentation to help users use the tool effectively.
  8. Cost-effectiveness and provides value for money. Ensure the tool’s cost aligns with the organization’s budget and requirements.

List of the Top RPA Testing Tools in 2023

Our top picks for the best RPA testing tools in 2023 include Automation Anywhere, UIPath, WorkFusion, and Blueprism. Their features, pros, and cons are listed below.

Automation Anywhere

Core Features:

  1. Offers both attended and unattended automation.
  2. Supports web, desktop, and Citrix automation.
  3. Offers a drag-and-drop interface for creating bots.
  4. Provides AI and cognitive automation capabilities.
  5. Offers strong security and compliance features.

Pros:

  1. Easy to learn and use.
  2. Offers a wide range of features and capabilities.
  3. Good customer support and training resources.
  4. High degree of scalability and reliability.

Cons:

  1. Limited integrations with other tools.
  2. High licensing costs.
  3. Requires a strong technical background to implement.

UiPath:

Core Features:

  1. Offers both attended and unattended automation.
  2. Provides a drag-and-drop interface for creating bots.
  3. Supports web, desktop, and Citrix automation.
  4. Offers AI and machine learning capabilities.
  5. Provides strong governance and compliance features.

Pros:

  1. Easy to use and learn.
  2. Good customer support and training resources.
  3. Strong community and developer ecosystem.
  4. Offers a wide range of integrations with other tools.

Cons:

  1. High licensing costs.
  2. Limited support for mobile automation.
  3. Requires a strong technical background to implement complex automation workflows.

WorkFusion:

Core Features:

  1. Offers both attended and unattended automation.
  2. Provides a drag-and-drop interface for creating bots.
  3. Supports web, desktop, and Citrix automation.
  4. Offers AI and machine learning capabilities.
  5. Provides a centralized automation platform for managing workflows.

Pros:

  1. Offers a wide range of features and capabilities.
  2. Good customer support and training resources.
  3. Provides a single platform for managing automation workflows.
  4. Offers strong security and compliance features.

Cons:

  1. Limited integrations with other tools.
  2. High licensing costs.
  3. Requires a strong technical background to implement.

Blue Prism:

Core Features:

  1. Offers attended and unattended automation.
  2. Provides a drag-and-drop interface for creating bots.
  3. Supports web, desktop, and Citrix automation.
  4. Offers AI and machine learning capabilities.
  5. Provides a centralized automation platform for managing workflows.

Pros:

  1. Offers a wide range of features and capabilities.
  2. Good customer support and training resources.
  3. Provides a single platform for managing automation workflows.
  4. Offers strong security and compliance features.

Cons:

  1. Limited integrations with other tools.
  2. High licensing costs.
  3. Requires a strong technical background to implement.

Myths and Misconceptions Related to RPA Testing

You need coding prerequisites

Contrary to popular belief, RPA testing does not rely on your background in coding. You are good to go if you have ample knowledge of how the software works.

You don’t need to supervise 

Most people assume that involving a robot means the entire process are automated, and human intervention is unnecessary. This is not true, as programming the RPA bot requires expertise from humans only. Once programmed, the bot can perform and automate the tasks.

You cannot afford RPA

While the initial deployment cost is high, RPA can be used by all sorts of businesses, including small-to-medium sized businesses, for the automation of tasks. In fact, by automating your tasks and enhancing productivity, you can recover your initial investment in around half a decade.

Conclusion 

While RPA testing comes with its range of benefits and ease, it is far easier to hire or partner with an organization that has expertise in providing RPA as a service, rather than diving into RPA testing on your own. Given the rise of automation and artificial intelligence, RPA is only expected to grow. Therefore, it is beneficial that you begin implementing it in the current times only.

FAQs related to Robotic Process Automation (RPA) Testing

Software testing methodologies are essential because they provide a systematic and structured approach to software testing. They help to ensure that software applications are thoroughly tested for quality, reliability, and functionality. This, in turn, helps to improve the overall quality of software applications and reduce the risk of errors or defects.

Test-driven Development (TDD) is an Agile software development approach involving automated tests before writing code. TDD helps ensure that the code is testable and helps identify and fix issues early in the development process.

Behavior-driven Development (BDD) is a software development methodology emphasizing collaboration and communication between developers, testers, and business stakeholders. BDD focuses on defining the expected behavior of the software application through user stories and then using these stories to drive the development and testing process.

Are you planning to create a top-quality digital solution? Talk to our experts now!

You might also like…

Did you know, the different types of software testing market size in 2021 was over $40 Billion? And we are expected to reach $70 Billion by 2030, which is massive growth in a decade. These numbers not just signify money made during this time, but the potential of the entire industry, which is part of a bigger picture known as software development.

Software testing is a crucial element within the software quality assurance domain. Each application development phase has its own set of testing modules and protocols that they must follow, ensuring smooth workflow and automation throughout. Regardless, a tester’s journey is never a short one, with various types of testing lined up as soon as the development phase reaches its end. 

These different types of software testing have their own set of features and advantages that benefit the product. From manual to automation testing, from functional to non-functional or agile testing, the list is long and extensive, giving us a scope of how rigorous and effective these testing processes are, not to mention time-consuming. But to deliver a bug-free and elite code, it has to go through all these testing phases. 

Let’s take a look at the types of testing that exist within quality assurance, their features, benefits, and their usage throughout a software development lifecycle.  

Manual VS Automated Testing 

Manual Testing

An old-school yet extremely crucial element of end-to-end testing, manual testing is where a tester conducts in-person testing by clicking and interacting through the app and its various APIs. They create a separate environment on various devices to test out the essential features of the application. While this may seem an appropriate way with a real-time human element involved, this can be extremely costly, time-consuming, and slightly flawed as well. Anything involving human interaction can be prone to human error, or typos that can alter the results based on the elements or steps they missed out. 

Automated Testing

While manual testing was all about humans, automated testing is the exact opposite in terms of testing techniques. Automated tests are performed by a machine running on a test script that was written in advance, based on a complex manner. These scripts can vary from complexities to the actions they want the machine to execute. From a single action to a series of actions within the UI that could lead to the same results. While it may seem extremely easy, with a machine conducting all the tests, it all comes down to how well the testing script was written. 

While anything automation has taken over the entire QA process in these times, it’s still integral to visit back to the roots and rely on manual testing from time to time, also known as exploratory testing, but we’ll talk more about it below.

The different types of tests

  1. Unit Tests

One of the most regularly used, effective, but basic testing methods, Unit testing is used on a separate unit and component to test out its features and corrections. Usually conducted during the application development phase, to find any defects, it’s cheaper to automate and run on a continuous integration server.

  1. Integration Tests

As stated within the name, this type of test provides us with results on whether the components involved within the software are working well together or not. Integration tests are expensive and need to be run continuously on multiple grounds and levels to ensure each component is well integrated and in sync with another one. 

  1. Functional Tests

Functional testing works around testing the business requirements of any application without pondering over the entire functioning of the system. It pays close attention to all the components whether they are functioning well and producing their desired results individually or not.

  1. End-to-end Tests

One of the most important testing phases is quality assurance. End-to-end testing replicates a human behavior of conducting the entire functions within the software, from start to finish. Its main aim is to verify whether basic and complex tasks within the software such as clicking on the right tab or getting the right options in the menu are functioning well or not. 

While this is one of the most important types of testing, it sure is expensive and requires constant attention when automated. To save cost and inconveniences, it is mostly recommended to conduct fewer end-to-end tests and rely more on other similar, but smaller testing types to get similar results on an individual level.

  1. Acceptance Testing

is Also known as the User Acceptance Test (UAT), the final phase of testing where the client, business, or the customer themselves take control over the app. Their testing is conducted in real-time, based on business scenarios and goals they want to achieve success via the application. The final outcome from acceptance testing usually deciphers whether the system is ready to go live or still needs alterations.

  • Alpha Testing

The final round of acceptance testing before the application is released to the customers.

  • Beta Testing

Conducted by the users and customers themselves, the complete application is released to a special set of users who have signed up for this service on the app store. The app is released specifically for these users who conduct a thorough examination of the application in real-time and send in their feedback. The feedback is then considered and incorporated within the app before the official release. 

  • Operational acceptance testing (OAT)

To ensure that the system administrator is working effectively to cater to a user query in a real-time environment, OAT is conducted. 

  1. Performance Testing

To test how an application performs under various scenarios and workloads, Performance Testing is the go-to testing type that you would target for this. It gives an overall idea of how well your application is performing in terms of responsiveness, speed, reliability, and more. To test these out, tools like Loader.IO, JMeter, and LoadRunner are used throughout the process.

This test can help you determine the capacity your application can work, the load it can handle, or the number of customers per minute it can handle. Whether the data that goes through the system is reaching accurately or not. Performance testing is the best possible way to measure any future roadblocks or bottlenecks that may occur, measure stability during peak hours, etc.

Performance testing on its own is divided into further branches of testing like, 

  • Load Testing
  • Stress Testing
  • Scalability Testing
  • Volume testing (flood testing)
  • Endurance Testing (Soak Testing)
  1. Smoke Testing

If you want to find out whether your application is functioning well overall before it’s deployed, or is adjusting well in a new environment after deployment, a Smoke test is your answer. Without going deep into the system, smoke tests do a quick, in-expensive run-through of your software assuring that the system is well intact and all the major functionality is running smoothly.

While the smoke test in itself is inexpensive, it does help you decipher whether a more expensive test is to be conducted any further or not. Usually, a smoke test takes place right after it is deployed into a new environment, to see if there are any discrepancies or not.

  1. Security Testing

Laying under non-functional testing, security testing is one of the most essential testing types that is conducted by a special team with expertise and background in cybersecurity. They conduct a clean sweep of the entire interface and software of the app to check on any internal or external threats it may be vulnerable to. The testing covers the system for any viruses, and hacks, and also takes a deep look into the authentification and authorization processes if any. An overall protective shield is also applied to prevent any attacks as well.

  • Penetration Testing

Pen testing is an authorized self-inflicted cyberattack on the application to declare any weak aspects or data leaks within the complete system. This form of ethical hacking is performed by professionals who then submit the final report to the organization.

  1. Usability Testing

While testing is a pretty rigid and robotic task on its own, what is it that tests out the overall “user experience” of the application? Usability testing. To see whether the app is working well, a human perspective is instilled in this testing method to test the user-friendliness of the application overall. 

  • Exploratory testing

An informal testing method whose aim is to find any flaws within the existing application through their knowledge of the business domains. 

  • Cross-browser testing

It is essential to find the look, feel, and performance of an application on multiple browsers, operating systems, mobile devices, and platforms. This is an essential feature for a well-ensured user experience, as not every user owns the same device, but they deserve the best experience regardless. A browser stack is a good tool to carry out this type of testing.

  • Accessibility Testing

Leaving no stone unturned here, accessibility testing is focused on making the app effective and user-friendly for the disabled. Features like font size, color saturation, sound, etc are taken a good look at to avoid any inconvenience. 

  1. Compatibility Testing

Finding compatibility is not just a human factor anymore, even applications and systems require a compatibility test that deciphers whether the system is working well on various platforms and devices or not. It is important to figure out whether the system is in sync with the web servers, hardware, and network environment or not. It ensures whether it’s good enough to work around various configurations, databases, and browsers, or not.

Other Types of Testing

The world of testing doesn’t end here, with various complexities around us in technological forms, now fixing their roots in AI and metaverse, this factor within software quality assurance has evolved as well. To keep itself relevant the field of QA has further extended its roles and created new factors within testing that not only cover the basics but have the technical abilities to delve deeper. 

Some of these non-conventional testing methods are as follows: 

  • Ad-hoc Testing
  • Back-end Testing
  • Browser Compatibility Testing
  • Backward Compatibility Testing
  • Black Box Testing
  • Boundary Value Testing
  • Branch Testing
  • Comparison Testing
  • Equivalence Partitioning
  • Example Testing
  • Graphical User Interface (GUI) Testing
  • Incremental Integration Testing
  • Install/Uninstall Testing
  • Mutation Testing
  • Negative Testing
  • Recovery Testing
  • Regression Testing
  • Risk-Based Testing (RBT)
  • Static Testing
  • Vulnerability Testing

Final Thoughts

Software quality assurance testing is necessary, and more importantly, it’s an integral part of the software development timeline. Without all these testing branches and features the application will come across various developmental and scalability crises that will result in the overall app and business performance as well.

FAQs Related to Different Types of Testing

Software testing methodologies are essential because they provide a systematic and structured approach to software testing. They help to ensure that software applications are thoroughly tested for quality, reliability, and functionality. This, in turn, helps to improve the overall quality of software applications and reduce the risk of errors or defects.

Test-driven Development (TDD) is an Agile software development approach involving automated tests before writing code. TDD helps ensure that the code is testable and helps identify and fix issues early in the development process.

Behavior-driven Development (BDD) is a software development methodology emphasizing collaboration and communication between developers, testers, and business stakeholders. BDD focuses on defining the expected behavior of the software application through user stories and then using these stories to drive the development and testing process.

Are you planning to create a top-quality digital solution? Talk to our experts now!

You might also like…

Automation testing has become immensely popular and infleuntial in quality assurance because it increases test coverage, improves accuracy, and allows testers to detect errors quickly. For this purpose, many tools have been developed to assist QA engineers in performing automation testing per their requirements. 

Here in this blog, we will discuss:

  • The meaning of automation testing tools
  • How to choose an automation testing tool
  • Types of automation testing tools
  • List of the top automation testing tools

What are Automation Testing Tools? 

Automation testing tools are software programs software testers and engineers use to automate the execution of tests on software applications. These tools can simulate user interactions and validate expected outcomes without manual intervention. This, in turn, saves time and resources while ensuring that the application meets the required quality standards.

Due to the rising demands and usage of automation testing tools, many options have emerged, ranging from open-source to commercial tools. These tools also differ by the type of testing required, such as mobile testing, functional testing, or any other type of software testing. Plenty of QA services worldwide make use of such tools to ensure that they perform tests with enhanced efficiency.

Major Types of Automation Testing Tools

Since automation testing is a broad domain, miscellaneous tools are used for different purposes. Here we have listed the main categories of automation testing tools:

  1. Web Automation Tools: used to automate the testing of web applications. They simulate user interactions with web pages and can be used to test the functionality, performance, and reliability of web applications. Cypress is a popular example of a tool used by many web testing services
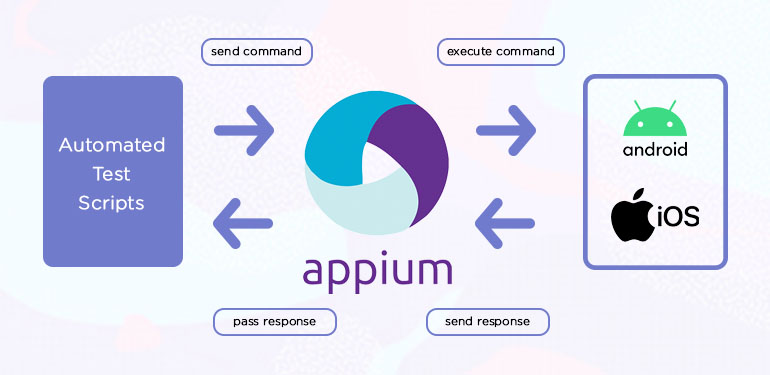
  1. Mobile Automation Tools: used to automate the testing of mobile applications. They simulate user interactions with mobile devices and can be used to test the functionality, performance, and reliability of mobile applications. Appium and Espresso are examples of widely used mobile automation tools.
  1. API Automation Tools: automate the testing of application programming interfaces (APIs). They can be used to test the functionality, performance, and reliability of APIs by sending requests and verifying responses. Examples of API automation tools include Postman, RestAssured, and SoapUI.
  1. Robotic Process Automation (RPA) Tools: used to automate repetitive tasks usually performed by humans. Examples of RPA testing tools include UiPath, Automation Anywhere, and Blue Prism. These are commonly used by organizations providing RPA services

Key Factors to Consider When Choosing an Automation Testing Tool

Before settling down on what tool you should go with, make sure to consider the following factors:

  1. Testing Requirements

One of the best practices in automation testing is narrowing down your requirements for selecting the right type of tool. This is also the first step and involves identifying the specific testing requirements of the application or software. This includes the types of tests that need to be automated, such as functional testing, performance testing, security testing, and so on.

  1. Tool Compatibility

It is necessary to ensure that the tool is compatible with the application’s technology stack or software being tested. This includes the programming language, platform, and database the application uses.

  1. Ease of Use

The automation testing tool should be easy to use with a user-friendly interface, even for non-technical users. This includes features such as drag-and-drop test creation, intuitive test scripting, and clear reporting.

  1. Integration Capabilities

Integration with other software is crucial and heavily demanded feature in all types of technologies. Similarly, the automation testing tool should be able to integrate with other software tools used in the software development lifecycle, such as continuous integration and delivery tools, bug tracking tools, and test case management tools.

  1. Customizability

The automation testing tool should be customizable to meet the application’s or software’s specific needs. This includes the ability to add custom test cases and scripts, as well as the ability to customize test reporting.

  1. Technical Support

In case of any issue or bottleneck, the tool should offer technical support and resources to help users troubleshoot issues and maximize the tool’s effectiveness.

  1. Pricing

If the tool is not free, then it should be cost-effective and provide a good return on investment. This includes considering factors such as the upfront cost of the tool, ongoing maintenance and support costs, and the cost of training users.

What are the top automation testing tools in 2023?

While you will come across a plethora of automation testing tools, narrowing down the best ones can be a hefty task. Here we have shortlisted the nine best ones for you in:

API Testing: 

1. Karate:

A behavior-driven development (BDD) testing framework that allows for API and UI testing and provides a clear and readable syntax for test scenarios.

Pros:

  • Supports BDD approach
  • Built-in reporting and logging
  • Easy to learn and use
  • Supports multiple protocols such as HTTP, JDBC, and JMS
  • Integrates well with Continuous Integration tools like Jenkins

Cons:

  • Limited documentation available compared to other tools
  • Not suitable for complex test scenarios

2. Rest Assured 

A Java-based open-source automated testing tool for RESTful web services that can be used to validate API functionality, performance, and security.

Pros:

  • Open-source and widely used by API testing services
  • Supports a variety of protocols, including REST and SOAP
  • Provides a user-friendly interface for designing and running tests
  • Offers advanced features for security testing and data-driven testing

Cons:

  • Requires significant knowledge of API testing and programming languages
  • Lacks support for functional testing of non-API applications
  • May be less user-friendly than other API testing tools

3. Postman 

A collaboration platform for API development and testing that can be used for functional and performance testing of APIs. It is a popular choice among functional testing services as it allows testers to send requests, validate responses, and test the functionality of APIs across different platforms and environments.

Pros:

  • Offers a user-friendly interface for designing and running API tests
  • Provides a range of advanced features for testing and collaboration
  • Supports multiple protocols, including REST and SOAP
  • Offers integration with other testing and development tools

Cons:

  • Lacks support for UI testing and non-API testing
  • May require a paid subscription for more advanced features
  • May be less suitable for complex testing scenarios

Web Testing: 

4. Selenium 

A popular open-source automation testing tool used to test web applications.

Pros:

  • Open-source and widely used for web automation testing
  • Supports a variety of programming languages and frameworks
  • Supports parallel testing across multiple browsers
  • Offers a range of plugins and integrations for various testing scenarios

Cons:

  • Requires significant programming knowledge to use effectively
  • Can be time-consuming to set up and configure
  • Lacks support for testing non-web applications and API testing

5. Cypress 

A JavaScript-based end-to-end testing framework that can be used to test web applications. 

Pros:

  • Designed for modern web applications and JavaScript frameworks
  • Offers real-time feedback and automatic test updates
  • Provides built-in time travel debugging and automatic retries
  • Supports parallel testing across multiple browsers and devices

Cons:

  • Only supports JavaScript and Node.js for writing tests
  • Lacks support for testing non-web applications and API testing
  • May require additional configuration for more complex testing scenarios

6. Playwright:

An open-source Node.js library for automating web browsers such as Chromium, Firefox, and WebKit, and it is designed to enable reliable automation of modern web applications. It provides a single API to automate web browsers, allowing developers to write cross-browser and cross-platform tests.

Pros:

  • Supports multiple browsers, including Chromium, Firefox, and WebKit.
  • Cross-platform support for Windows, Linux, and macOS.
  • Provides automatic waiting for page loads and other asynchronous events, reducing the need for manual waits in test code.
  • Supports headless and non-headless modes for test execution.
  • Offers fast execution speed and improved reliability compared to other browser automation tools.

Cons:

  • Being a relatively new tool, it may have limited community support compared to more established automation tools.
  • Has a steeper learning curve for beginners compared to simpler automation tools like Selenium.
  • Lacks some of the features offered by Selenium, such as browser extensions and browser-specific debugging tools.

Mobile Testing: 

7. Appium:

An open-source mobile automation framework that supports native, hybrid, and mobile web applications across iOS and Android platforms, hence rendering it a massively used tool by mobile app testing services.

Pros:

  • Supports both iOS and Android platforms
  • Uses a wide range of programming languages, including Java, Python, and Ruby
  • Supports both native and hybrid mobile applications
  • Offers a variety of built-in libraries to simplify automation tasks

Cons:

  • Requires setup and configuration for each mobile device being tested
  • Can be slower than other mobile automation tools

8. Espresso:

An Android-only UI testing framework that allows for fast and reliable testing of native Android applications and provides APIs for simulating user interactions and checking UI elements.

Pros:

  • Designed specifically for Android app testing
  • Provides good performance and speed
  • Allows for testing on real devices and emulators
  • Supports both Java and Kotlin programming languages
  • Provides built-in test recording functionality

Cons:

  • Only supports the Android platform
  • Limited support for hybrid and web applications.

9. XCUI Test

An automation framework developed by Apple for testing iOS applications. It allows developers and testers to write automated UI tests for iOS apps using the Swift programming language.

Pros:

  • Provides full access to all of the APIs and features of iOS
  • Offers built-in support for accessibility testing, which is important for ensuring that apps are usable by people with disabilities
  • Allows for parallel test execution, which can significantly speed up test runs

Cons:

  • Can be challenging to set up and configure, especially for those new to iOS development and testing
  • Requires a Mac computer to run and does not support testing of Android or other platforms

Wrapping Up – What Tool Should You Go With?

Selecting the right type of automation testing tool depends on your organization’s preferences and the type of testers present in the team. Karate may be a good choice if you are looking for a powerful and flexible API testing tool that can handle complex scenarios and support BDD. Selenium is a popular and versatile tool that can handle various browsers and programming languages. Webdriver I/O is a good choice if you prefer a lightweight, flexible tool that supports various mobile platforms.

To get more information about automation testing tools, you can get in touch with an automation testing service like VentureDive’s QA services. Not only can our team help you select the right type of tools, but we can handle and speed up your entire testing process with our expertise.

FAQs Related to Automation Testing Tools

Software testing methodologies are essential because they provide a systematic and structured approach to software testing. They help to ensure that software applications are thoroughly tested for quality, reliability, and functionality. This, in turn, helps to improve the overall quality of software applications and reduce the risk of errors or defects.

Test-driven Development (TDD) is an Agile software development approach involving automated tests before writing code. TDD helps ensure that the code is testable and helps identify and fix issues early in the development process.

Behavior-driven Development (BDD) is a software development methodology emphasizing collaboration and communication between developers, testers, and business stakeholders. BDD focuses on defining the expected behavior of the software application through user stories and then using these stories to drive the development and testing process.

Are you planning to create a top-quality digital solution? Talk to our experts now!

You might also like…

Coming across website and software crashes or delays can result in frustration for the end user and end up disappointing them. Organizations launching a new product can prevent such issues by investing in Software Performance Testing – a non-functional type of testing. This testing helps ensure the software application is functioning well under a lot of workload.

Here in this blog, we will discuss the following points related to Performance Testing:

  • Meaning of performance testing
  • Software performance testing processes
  • Different types of software performance testing
  • Common software performance testing tools
  • Performance testing with Apache

What is Performance Testing in Software Testing?

A non-functional testing type, performance testing helps analyze the behavior of an application in numerous situations. An application may work flawlessly with a few users per day but might run into performance issues when encountered with a large concurrent number of users, which results in load or stress on the system. 

Also known as Perf testing, Performance testing ensures that the application’s speed, response time, stability, and reliability are as required. It also builds confidence that the application is up to the mark and results in better execution and less maintenance.

Benefits and Objectives of Software Performance Testing

Evaluate system performance

The primary objective of performance testing is to evaluate the performance of a system under specific conditions, such as heavy load or extended usage. This helps determine if the system meets performance requirements and can handle the expected workload.

Improve User Experience

An important benefit of performance testing is that it helps identify bottlenecks and performance issues that may affect the user experience. The overall user experience can be improved by resolving these issues, and customer satisfaction can increase.

Ensure Scalability

Performance testing helps determine the scalability of a system, i.e., its ability to handle increased workloads. This is important for systems expected to grow or handle large amounts of data over time.

Detect performance-related bugs

Performance testing can help identify performance-related bugs and defects, such as memory leaks and slowdowns. This helps ensure that the system is stable and performs optimally.

Validate system capacity

Performance testing helps validate the capacity of a system, i.e., the maximum load it can handle before performance degradation occurs. This helps determine if the system can meet the expected demand and if additional resources are needed.

Identify performance optimization opportunities

Software performance testing results can provide valuable insights into areas where performance can be optimized. This can improve the efficiency of the system and reduce operational costs.

Meet Compliance Requirements

In some cases, performance testing is required to meet regulatory or industry compliance requirements. This helps ensure that the system meets the necessary standards and requirements.

Performance Testing Attributes

The following attributes are considered when testing a software’s performance:

  1. Speed:  whether the application responds quickly
  2. Scalability: the amount of load the application can bear at a given time
  3. Stability: how well the application remains stable when the workload is increased
  4. Reliability: if the application can work properly under certain conditions every time or not

Performance Testing Metrics

To evaluate the performance of a system, key metrics need to be defined for creating reports that explain the results to not just testers but all stakeholders as a whole.

Some standard performance testing metrics include:

  1. Response Time: The time it takes for the system to respond to a request or complete a task.
  2. Throughput: The amount of data or the number of requests the system processes in a given time period.
  3. Latency: The amount of time it takes for a request to be processed by the system, from the time it is received until a response is sent.
  4. Resource Utilization: The number of resources, such as CPU, memory, and disk space, used by the system during performance testing.
  5. Error rate: The number of errors or failures during performance testing. These are expressed as a percentage of the total number of requests processed.
  6. Scalability: The ability of the system to handle increased workloads, usually measured as a percentage increase in workload and the corresponding increase in response time.
  7. Memory leaks: The amount of memory consumed by the system over time, indicating possible memory leaks that may lead to performance degradation.
  8. Concurrent Users: The number of simultaneous users accessing the system during performance testing.
  9. Transaction per second: The number of transactions the system processes in a second.
  10. Bandwidth: The amount of data that can be transmitted over a network connection in a given amount of time.

Performance Testing Process

Different methodologies exist when it comes to the implementation of software performance testing. However, most organizations follow a generic framework comprising a seven-step process.

  1. Identifying the testing environment: by identifying the tools available, network configurations, hardware, and software, the testing team can design the test. This also helps in the early identification of testing challenges.
  2. Identifying the performance metrics, such as the response time to see what success criteria will be set for the performance testing.
  3. Planning and designing performance tests 
  4. Configuring the test environment 
  5. Implementing the test design  
  6. Executing the tests  
  7. Analyzing, reporting, and retesting  

Types of Performance Testing in Software Engineering

There are several types of performance testing, such as

Load testing

A real-world load is simulated to see how well the system performs under stress. With load testing, one can identify bottlenecks and check how many transactions or users the system can handle at a given period.

Stress testing

Another type of load testing, stress testing, involves testing the ability of a system to handle loads above their normal usage levels. This helps in determining what issues can arise under severe load conditions and what is the breaking point of the system.

Endurance testing

Also known as soak testing, endurance testing evaluates the behavior of a system over an extended period. The goal is to determine if the system can maintain responsiveness and stability under continuous usage.

During endurance testing, the system is subjected to a heavy load for an extended period, typically several hours to several days. Hence, testers can identify any performance issues that may occur over time, such as memory leaks, slowdowns, and failures. The results of endurance testing can provide valuable information for continuous improvement.

Systems that are expected to run continuously for long periods, such as online transaction processing systems, data centers, and critical infrastructure, are usually checked with endurance testing.

Spike testing

As the name suggests, spike testing focuses on checking how capable the system is of handling sudden traffic spikes. This type of testing helps identify what issues can occur if the system suddenly has to handle a high number of requests.

Scalability testing

When it comes to scalability testing, you increase the user load or data volume gradually instead of all at once. You may keep the workload at the same level but changes the resources, such as the CPU and memory. 

Scalability testing is further divided into upward scalability testing and downward scalability testing. In upward scalability testing, you try to find the maximum capacity of an application by increasing the number of users in a particular sequence. 

In downward scalability testing, the resources such as memory, CPU, disk space, or network bandwidth are reduced to check how well the system can behave without the optimum level of resources. Usually performed with other types of testing, such as stress and load testing, downward scalability testing provides insights into the system’s response in unexpected events such as hardware failure or resource degradation.

Volume Testing

Also known as flood testing, volume testing involves flooding the system with data to determine how well it performs when projected with large amounts of data.

Most-Recommended Software Performance Testing Tools

From commercial products to open-source software, one can choose from a myriad of options, depending on their performance testing tools, project constraints, budget, and technology stack. The most common options are as follows. 

  1. Apache JMeter: An open-source tool with load-testing options for web applications.
  2. Gatling: An open-source load testing tool supporting HTTP, JMS, JDBC, and WebSockets protocols.
  3. LoadRunner: A commercial tool for load testing with support for multiple protocols, technologies, and testing across various locations.
  4. BlazeMeter: A cloud-based load testing tool with free and paid versions. It allows users to test the performance of their websites and applications with real-life traffic simulations.
  5. AppDynamics: A commercial tool that provides real-time performance monitoring and diagnosis of applications.
  6. JUnit: A unit testing framework for Java that can also be used for performance testing.
  7. K6: An open-source tool by Grafana Labs commonly used in load testing.
  8. Locust: An open-source tool used to create and design load tests in Python.

While they all require scripting, Apache JMeter and BlazeMeter offer some codeless features, making them partially codeless testing tools.

Software Performance Testing with JMeter

One of the most commonly used tools utilized in software performance testing is Apache JMeter, a GUI and Java-based open-source software that helps users carry out multiple performance testing types, including load testing and spike testing. It is a popular tool used by many QA services too.

Setting up JMeter is not a challenging task. A prerequisite is already having JAVA installed and set up as the environment variable. The next step is downloading the zip file and executing the bat/sh file. If using Mac, it is even simpler to install with brew using the command “brew install jmeter” and launch using “open /usr/local/bin/jmeter” via terminal.

There are some terms one should be familiar with before using JMeter. Familiarity with these will help a beginner understand performance testing terminologies.

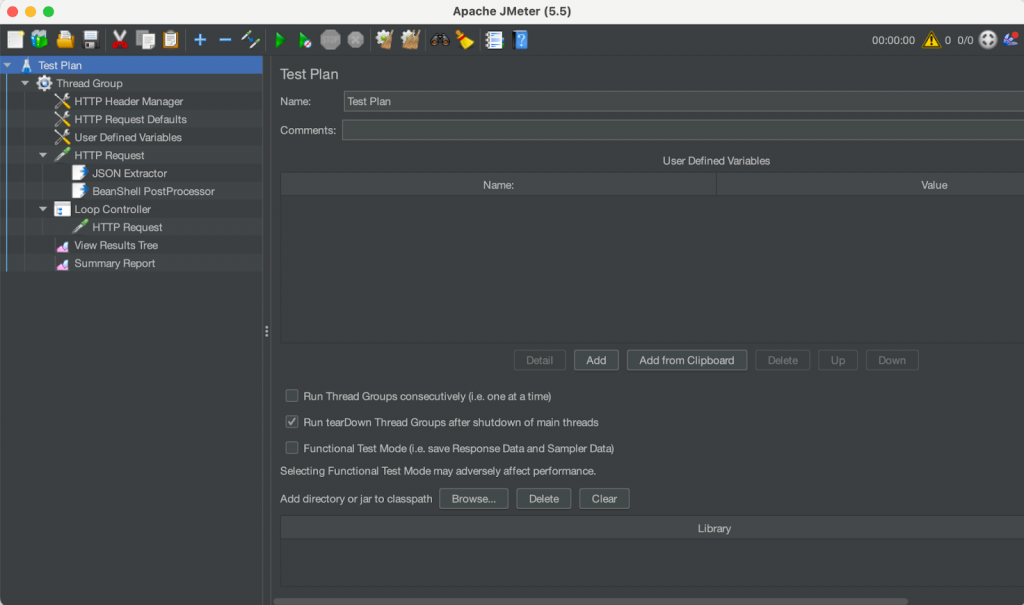
Test Plan

This refers to the main container, which contains all the network requests, extractors, headers, assertions, validations, etc. Everything that needs or is needed for performance testing should be inside it.

Threads: Thread Group

This is a set of network requests, or threads, that constitute a flow. For example, requests for login, search item, add to cart and place order make up one flow and would be part of one thread group. It’s also where properties for the flow are defined, such as the number of users, ramp-up period, and loop count.

Sampler: HTTP Request

A common example for this category would be an HTTP request. Your request is defined here, which may contain the endpoint, protocol request method, body, parameters, etc.

Config Element: HTTP Header Manager

Most of the time, a set of network requests belonging to the same flow would share a similar set of headers. The Header Manager is where all of these can be added to avoid adding them each time for each request. 

Config Element: HTTP Request Defaults

Like the Header Manager, you can keep standard parameters in the Request Defaults, such as protocol, server name or IP, and shared parameters, if any.

Config Element: User-Defined Variables

As the name suggests, any values that you wish to define yourself can be stored here, for example, a random string or random number.

Post Processors: JSON Extractor

The purpose of JSON Extractor is to extract anything from the response data. For example, you may need the authentication token from a login API to pass on to another API. You can use the JSON Extractor to extract it. This will need to be placed within the network request whose data needs to be extracted.

Post Processors: BeanShell PostProcessor

Just like a JSON Extractor can be used to extract JSON data from the response, a PostProcessor can be used to set the value of the extracted JSON path into a named property. We use this further to pass to the next API to send data outside the thread group.

Logic Controllers

Logic Controllers are used to set conditions in your test plan. For example, IF controllers can be used for If-Else conditions, Loop controllers can be used for redundant processes, etc.

Counters

To use loops in logic controllers, you need counters to increment the minimum value up to the maximum for the number of total repetitions required in the thread group. To repeat a network request several times, you must add that request and the counter within the loop controller.

Assertions

With Assertions, you can verify that the outcome meets the desired expectations. There are multiple assertion types, for example, Response or JSON Assertion.

Listeners

The primary purpose of listers is to observe and record the results. At the end of the performance testing, you may view the results from various listeners: Results Tree, Results Table, Summary Report, Graph, etc.

Once you have added these, you will have a structure similar to the following. This is a basic framework to get started with simple performance testing. You can use this to add more as your requirements grow. 

Listeners in Apache JMeter

Performance Testing Best Practices

To ensure that you get the best out of software performance testing, you can implement some best practices such as:

Define Performance Requirements

Clearly define and document the performance requirements for the system under test. This includes response time, throughput, resource utilization goals, and any constraints or assumptions that may affect performance.

Use Realistic Workloads

Use workloads that closely mimic real-world usage patterns and that stress the system meaningfully. This includes using realistic data sets, network configurations, and hardware configurations.

Automate Testing

Automate the performance testing process as much as possible, including test case execution, data collection, and analysis. This allows for faster and more repeatable performance testing.

Monitor Performance Metrics

Monitor key performance metrics, such as response time, throughput, and resource utilization, during performance testing. This allows you to identify and isolate performance bottlenecks and track progress over time.

Involve Development and Operations Teams

Involve the development and operations teams in the performance testing process. This allows for team collaboration and communication and helps ensure that performance considerations are integrated into the software development process, which is one of the best practices in test automation.

Continuously Test and Monitor Performance

Continuously test and monitor performance throughout the software development lifecycle, not just at the end. This allows for early detection and resolution of performance issues and helps ensure performance is optimized throughout the development lifecycle.

Plan for Scalability

Plan for scalability from the outset of the development process. This includes considering how the system will scale under increasing workloads and designing the system to be scalable.

Validate Performance in Production-Like Environment

Validate performance in a production-like environment, using production data and hardware configurations to ensure that performance meets expectations in real-world conditions.

Wrapping Up – How Important is Performance Testing in Software Testing?

To ensure that your product is fit to be released and functions well under all load types, you must opt for performance testing before it fails upon launch. As such, partnering with a performance testing service can help validate your product’s performance metrics and ensure it is user-friendly.  Venture’s QA engineers are proficient in identifying all sorts of bottlenecks in software and websites, helping clients launch software free from all flaws.

FAQs for Software Performance Testing

Software testing methodologies are essential because they provide a systematic and structured approach to software testing. They help to ensure that software applications are thoroughly tested for quality, reliability, and functionality. This, in turn, helps to improve the overall quality of software applications and reduce the risk of errors or defects.

Test-driven Development (TDD) is an Agile software development approach involving automated tests before writing code. TDD helps ensure that the code is testable and helps identify and fix issues early in the development process.

Behavior-driven Development (BDD) is a software development methodology emphasizing collaboration and communication between developers, testers, and business stakeholders. BDD focuses on defining the expected behavior of the software application through user stories and then using these stories to drive the development and testing process.
Are you planning to create a top-quality digital solution? Talk to our experts now!

You might also like…

When it comes to software quality assurance, organizations lay a heavy emphasis on ensuring flawlessness in their products and reducing defects as much as possible. This is because many software organizations are leaning towards Continuous Integration/Continuous Deployment (CI/CD).  This is where automation testing proves to be beneficial as it reduces subsequent test efforts. Not only does it reduce test time, but it also increases test coverage. 

Parallel testing is an automated testing technique where you can test multiple versions of subcomponents of an application with the same input on different systems. The prime benefit of it is that it helps reduce test execution time and speeds up the testing process.

In this blog, we will discuss the following aspects of Parallel test execution:

  • Parallel Testing definition
  • Benefits of Parallel Testing
  • Challenges posed by Parallel Testing
  • Implementation of Cypress Parallel Test Execution

What is Parallel Testing in Software Testing?

Parallel testing or parallel test execution is a software testing approach in which multiple tests are run at the same time simultaneously. The goal of parallel testing is to reduce the time it takes to run a suite of tests by dividing the tests into smaller groups and running them in parallel. This can be achieved by executing tests on multiple physical or virtual machines or by dividing the tests into smaller chunks and running them in parallel on the same machine. Parallel testing is often used in CI/CD pipelines to speed up the testing process and make the pipeline more efficient. By running tests in parallel, teams can reduce the time it takes to get feedback on the quality of their code, which can help to accelerate software development and delivery. Depending on the requirements of the project, QA teams can perform parallel test execution on multiple virtual machines, browser divides, and processors. 

The main characteristics of Parallel Testing are:

  • Ensures that the new version of the application performs correctly.
  • Ensures consistencies and inconsistencies are the same between the old and the new version.
  • Ensures the integrity of the new application.
  • Verifies if the data format between the two versions has changed.

What are the Benefits of Parallel Testing?

Now that we have explored the meaning and definition of parallel testing, we can go through the advantages it offers.

The key benefits of parallel testing are listed as follows:

  1. Speeds up execution

If a test takes one minute across 10 devices, with parallel test execution, you can complete the test in one minute, hence speeding up the process and saving you time.

  1. Improves test coverage

You can test across different devices and combinations, such as desktop OS/browser combinations together. This increased test coverage reduces the chances of releasing the product with any type of bugs and defects.

  1. Proves affordable

Renting testing time on cloud services is a more cost-effective alternative to constructing and maintaining an in-house testing infrastructure. Furthermore, cloud-based testing grids allow for tests to be run at a high level of parallelism, significantly lowering the cost per test.

  1. Helps optimize CI/CD processes

For continuous integration and delivery, opting for parallel test execution allows the QA teams to run tests as soon as the developers have submitted the new code updates. With quick reporting and feedback, communication is enhanced between the teams.

  1. Improves the QA routine

Quality assurance teams can improve their processes by performing more tests within a shorter span of time, thus having more time to identify potential bugs and loopholes.

  1. Enhances Resource Utilization

Parallel testing allows the effective utilization of available testing resources, including hardware and virtual machines, to complete tests more efficiently.

What are the Parallel Testing Challenges?

While there are plenty of advantages of parallel testing, it comes with its own set of challenges too.

The cons of parallel testing include:

  1. Complex Test Management

Parallel testing requires complex test management and coordination, including the allocation of resources, the scheduling of tests, and the management of multiple test environments.

  1. Potential for Test Failures 

When running multiple tests at the same time, there is a higher potential for test failures and errors, which can impact the accuracy of test results.

  1. Specialized Hardware Requirements

Parallel testing may require specialized hardware or virtual machines, which can be expensive to purchase and maintain.

  1. Resource Intensity

Parallel testing can be resource-intensive, requiring significant processing power and memory to run multiple tests at the same time.

  1. Increased Costs

While parallel testing can reduce the cost per test, the overall costs associated with setting up and maintaining a parallel testing infrastructure can be significant.

  1. Compatibility Issues

When running multiple tests at the same time, compatibility issues can arise between different tests and the environment in which they are being run, leading to inaccurate test results.

  1. Maintenance Overhead

Maintaining a parallel testing infrastructure can be complex and require ongoing maintenance and support to ensure that it is functioning correctly.

Understanding Cypress Test Execution

Here, we will demonstrate parallel test execution with Cypress, a front-end testing tool built on JavaScript. Since running all tests in a row can take a long time, Cypress has a feature to run tests at the same time and save time and money. 

To make this happen, you can use Continuous Integration (CI) to run your tests on multiple machines. However, Cypress’s documentation warns against using the parallel parameter on one machine because it can slow down your system if it can’t handle multiple tests at once. Instead, Cypress recommends using multiple containers. If you have a powerful machine for CI and enough resources, you can also do parallel testing on one machine.

Using Cypress, Parallel Execution is only possible with Continuous Integration. It also requires your project to be set up with Cypress Dashboard for recording tests. This is because before running in parallel, your tests need to run at least once with Cypress Dashboard. The dashboard service records the average time a test takes to run, and that time duration eventually supports splitting the tests into multiple machines or instances. 

Each spec file in your project is assigned to the available machine or instance according to Cypress’ balance strategy. Additionally, the run order cannot be guaranteed each time when parallelized. 

The following texts will cover how to set up your Cypress project on the Dashboard and start running tests in parallel on a single machine. 

Step 1: Connect to Cypress Dashboard

The first step is to connect to Dashboard. To do so, launch Cypress Runner and select the Runs tab, then click Connect to Dashboard and set up the project.

Connect to Cypress Dashboard for Parallel Testing

Once the project is set up, it will generate a project ID and record key. These two values are used to uniquely identify the Cypress project. The project ID needs to be stored in the cypress.json file and the record key can be used while running the tests, to start recording with Cypress Dashboard.

Record key in Cypress Dashboard during Parallel Testing

Step 2: Record tests run with Cypress Dashboard

With the record key, your project is allowed to record tests to the Dashboard Service, which is a requirement for parallel execution. It is the key that enables you to write and create runs. 

You can run the tests using the following command:


cypress run –record –key <record key>

Once this is executed locally or through CI/CD, the test run will be recorded, and the results will be displayed on Cypress Dashboard.

Step 3: Run Parallel Test Execution

Parallel Test Execution results on Cypress

Now that the project is successfully set up and a test run has been completed, you can move to the parallel execution of tests. You can either set up multiple machines or utilize the single machine your CI provider is set up on. 

In order to allow the tests to run in parallel, the parallel flag needs to be used along with the record flag and key. 

cypress run –record –key <record key> —-parallel 

You can store this command in the package.json file

Store command in package.js file

The Process for Parallel Test Execution

  1. The CI machine contacts the Dashboard service to specify which spec file to run.
  2. The machine receives the spec file to run by Cypress.
  3. Cypress calculates the duration to test each file (these were recorded in the initial run)
  4. Based on the estimations, Cypress distributes the spec file one by one to each available instance in a way that minimizes the overall time of the test run.
  5. The tests are run on each instance as per availability until all the tests have been executed.
  6. Upon completion, there may be a run completion delay or waiting period in case any more relevant post-execution work remains.
Parallel Test Execution process

To put it simply, in order to have multiple instances, you need to specify the number of stages and run the above-mentioned command in each stage. Cypress will launch the number of instances respectively, and the ‘–parallel’ key will ensure that the tests are split into the instances. This can only be done through CI and not locally. 

Parallel execution of Cypress Tests through Jenkins

One of the simplest ways to perform parallel execution is to use Jenkins File, which is a text file containing the definition of a Jenkins Pipeline. It is usually stored in the root directory of the repository. Usually, pipelines consist of stages and steps, but this file follows Groovy syntax. 

Parallel execution can easily be performed using a Declarative Pipeline, which contains additional parameters, such as parallel stage and agent. For Cypress, you also need to have the NodeJS plugin installed in Jenkins, and the name specified for its installation needs to be provided under tools in the Jenkins File. 

Defining a Declarative Pipeline for Parallel Execution

  1. Create a file in the root directory, and name it “Jenkinsfile”
  2. Start with a simple pipeline section.
  3. Under the pipeline, specify the agent. You can set it to ‘any’ since we are using a single machine, the only one available. Without the agent directive, the pipeline would be considered invalid.
  4. Specify the tools. In this case, you need NodeJS, so mention the name set for this plugin.
  5. Specify the stages directive. This tells what the “work tasks” of the pipeline consist of.
  6. Under the stages, mention the stage with a name. The stage refers to one of those tasks. A stage can have several sub-stages as well.
  7. Under the stage, state the steps. These are the steps to perform the tasks. The steps should contain the batch or shell commands needed for execution.
  8. For parallel execution, you must create a parallel section under the stage. This in, turn can have multiple stages and steps under it, as shown in the example below. Define stages under the parallel section as many times as you require the number of instances, and mention the command for parallel execution under them. Make sure that the ‘–parallel’ flag is passed, otherwise, the entire test suite will be executed on each instance.
  9. You can use ‘echo’ to print to the console, and ‘sh’ for shell commands, which we will be using to run tests.
  10. At the end, you can have a stage to generate the reports. One thing to note here is that if one stage (excluding the ones in the parallel stage) fails, the next sequential stage may not be executed due to the failure of the previous one. For example, if even a single test fails, the last stage to generate the final report will not be run due to the previous failure. To avoid this, you can state a post section to handle such scenarios and define the command as per the condition. For commands that must always run, you can state them under the always condition. 

This will result in a basic structure for a declarative pipeline. There are many more options that you can add as per your need, such as environment and when conditions. 

Once that’s done, save your file and push your changes. In the end, you will have a pipeline that looks like this: 

Defining a Declarative Pipeline for Parallel Execution
Set up Jenkins job

Launch Jenkins and Add New Item and select Pipeline. 

Set up Jenkins job

Firstly, click on the Pipeline tab. Then, under Definition, select Pipeline script from SCM, and add your Git repository URL and credentials.

Click on the Pipeline during Parallel testing

Also, specify the branch name and path to Jenkinsfile.

Specify the branch name during parallel testing

Click on Apply and then Save.

To run the tests, click on Build now. After running your tests, you will be able to see the average time taken during each stage as well.

Pipeline cytest during parallel testing

As per the commands provided in this example, Cypress will divide the test suite into 3 stages, and the tests will be divided one by one into these three instances as per availability. 

This way, you can perform parallel execution of Cypress Tests using Cypress Dashboard and Jenkins on your machine. 

Limitations of Cypress Test Execution

While there are many advantages to parallel execution with Cypress, there are some limitations to this feature as well.

  1. Cypress Dashboard is a paid service

The free version of Cypress provides parallel execution, but the number of test runs per month is limited to 500 only. This means that if you have 100 tests in your project, you will be able to run the entire suite only 5 times, as Cypress Dashboard equates one test case to one test run. Therefore, if you need your tests to run daily or hourly, you will need to opt for a paid version that would provide you with the number of test runs per need. 

  1. You might run into resource and capacity limitations

If you have a powerful machine that can handle heavy workloads, then resource and capacity limitations would be fine with launching multiple instances. However, if your machine has limited resources, you might get some unexpected and strange failures in the test run, which are otherwise passing, or your system might lag sufficiently, and the test run may lag or get blocked. 

To overcome these challenges, it is better to have a separate designated system for your Jenkins or have it hosted on the cloud, and these concerns will hence be overcome. Cypress Dashboard has made it much easier to parallelize tests, as not only does it provide online access to your recorded test results, but it also provides rich analytics and diagnostics for your test results.

FAQs for Parallel Test Execution

Software testing methodologies are essential because they provide a systematic and structured approach to software testing. They help to ensure that software applications are thoroughly tested for quality, reliability, and functionality. This, in turn, helps to improve the overall quality of software applications and reduce the risk of errors or defects.

Test-driven Development (TDD) is an Agile software development approach involving automated tests before writing code. TDD helps ensure that the code is testable and helps identify and fix issues early in the development process.

Behavior-driven Development (BDD) is a software development methodology emphasizing collaboration and communication between developers, testers, and business stakeholders. BDD focuses on defining the expected behavior of the software application through user stories and then using these stories to drive the development and testing process.
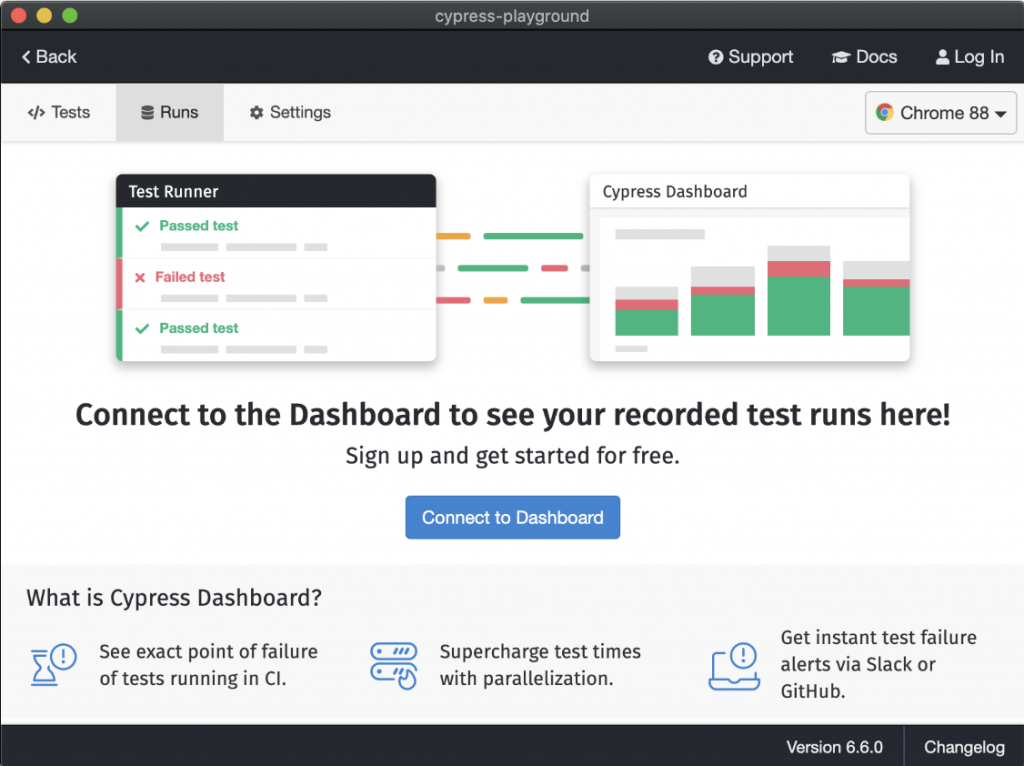
Are you planning to create a top-quality digital solution? Talk to our experts now!

You might also like…

The best way to deal with cybersecurity attacks is to remain aware of their different types. One of these types is client-side cybersecurity threats, i.e. when a user downloads malicious content. 

What happens after the user downloads malicious content? In most cases, we hear about security breaches, losing access to our accounts, and witnessing further malicious activity on our websites.

When it comes to client-side attacks, the two most common types are CSRF and XSS attacks. What are CSRF vs XSS attacks? Why should you know about them? In this blog, we shall go over the definitions, differences, working, and prevention methods for Cross-Site Request Forgery and Cross Site Scripting Attacks.

CSRF vs XSS Attacks – In Summary

XSS AttacksCSRF Attacks
XSS is the abbreviation for Cross-Site Scripting.CSRF is the abbreviation for Cross-Site Request Forgery.
The corrupted script is introduced in the client-specific website script.The site users may end up injecting the corrupted HTTP requests to the targeted site, without being aware of the outcome.
Random and unauthenticated data is introduced bit by bit.The success of a CSRF attack depends on the browser’s features. A CSRF attack may only succeed if the browser can process the attack bundle.
JavaScript is entirely responsible for XSS attacks.CSRF attacks may not always require JavaScript.
The target site is sent the corrupted code for processing.The troublesome code is stored on third-party websites rather than the main site.
A website that has an XSS vulnerability can be susceptible to a CSRF attack as well.A website that has suffered from a CSRF attack may not be necessarily prone to an XSS attack.
XSS attacks are quite harmful and nefarious.CSRF attacks are not as destructive.
Once an XSS attack is successful, the hacker can exploit it in any manner possible.Hackers have limited ability to exploit and can only cause damage up to the capacity of the URL.
XSS attacks prove to be much more dangerous.CSRF attacks are not as dangerous as XSS attacks.

What is CSRF & How Does it Work?

CSRF or Cross-Site Request Forgery Attacks involve tricking the users into performing an action on behalf of the hacker. The user is not aware of the action they are performing, such as clicking a link or loading a page attached to a malicious request. 

CSRF attacks are also known as session-riding attacks or one-click attacks. It relies on a verified user to attack a website and does not take over the service provider directly. As such, for a CSRF attack, the hacker must take assistance from someone verified or authenticated for accessing a server and then deliver malicious content to the user. It involves the usage of social engineering techniques to convince the user to perform an action. 

The aim of a hacker in a CSRF attack is to bypass the origin policy, which prevents one website from interfering with another website.

How does CSRF Work?

When you are using a small program or utility, your browser sends multiple HTTP requests while you’re working, such as clicking or typing a URL on the address bar. The HTTP requests are sent while your usage is explicit and hence in the known.

Similarly, your browser is dispatching implicit HTTP requests too for strategizing the code on the web page. An example is loading an image on a webpage using a separate HTTP request. You did not explicitly perform any action to load the image except scroll or browse around the page.

Such implicit requests may also be directed to domains that have nothing to do with the location of the page you are viewing. For example, an image displayed on venturedive.com may come from example.com. 

What matters in such cases is that the requests to both locations come from the same browser, so your current authentication method (whether it’s a session cookie or another method) applies to both locations. As such, if your browser opens actualwebsite.com and loads an image from example.com, it will create a user session on example.com, and the web application for example.com will consider you as an authenticated user (even though you originally opened actualwebsite.com, not example.com).

With these conditions in place, the attacker can construct a web page containing the following HTML:


If a victim user visits the attacker’s internet web page, the following will happen:

  • The attacker’s page will trigger an HTTP request to the vulnerable website.
  • If the consumer is logged in to the prone web website, their browser will mechanically encompass their consultation cookie inside the request (assuming SameSite cookies aren’t getting used).
  • A website that is not secured will put the request in normal behavior and treat it as having been made by the victim user and change their email address.

cross site request forgery infographic

Limitations to Cross-Site Request Forgery

For a cross-site request forgery attack to happen and succeed, several conditions must be met. These conditions act as limitations to a successful CSRF attack and are as follows:

  • The targeted site should not test the referrer header or the victim with a browser or plugin that permits referrer spoofing.
  • The attacker ought to find a form submission at the goal site or a URL that has side results that do something (e.g., transfer money or modify the victim’s email address or password).
  • The attacker should decide the right values for all the bureaucracy or URL inputs; if any of them are required to be secret authentication values or IDs that the attacker cannot guess, the assault will most likely fail (unless the attacker is extremely fortunate in their bet).
  • It is essential for the attacker to trap the victim on an internet web page with malicious code while the user is logged into the target website online.
  • To access the aimed website, the threat actor must trespass the user authentication.
  • Absence of unpredictable request parameters: the request has values that can be guessed easily.
  • Cookie-based session handling: this includes issues with many HTTP requests. Since the application only relies on session cookies for identifying who made the requests, there is no other method for validating user requests or tracking sessions.
  • The assault is blind: the attacker cannot see what the target website sends returned to the victim in reaction to the forged requests until they make the most of a move-web page scripting or other malicious programs on the target internet site. Similarly, the attacker can most effectively target any hyperlinks or put up any paperwork that arises after the solid preliminary request if those subsequent links or forms are similarly predictable. (Multiple objectives can be simulated by including multiple photos on a page or by using JavaScript to introduce a put-off between clicks.)

Prevention Against Cross-Site Request Forgery (CSRF)

Few powerful techniques exist for both the prevention and mitigation of CSRF assaults. It is better to implement prevention techniques beforehand, such as safeguarding login credentials and denying unauthorized actors the right to enter the programs.

Some of the best practices include:

  • Logging off web applications when not in use
  • Securing usernames and passwords
  • Not allowing browsers to remember passwords
  • Avoiding simultaneous browsing while logged into an application

For internet applications, multiple solutions exist to block malicious site visitors and save the user from attacks. Some of the most common mitigation techniques are to generate random tokens for every consultation request or identity.

CSRF Tokens: What Are They and How Do They Help?

These tokens are eventually checked and proven by way of the server. Session requests having both reproduction tokens and missing values are blocked. Instead, what happens is that if a request received does not match its consultation ID, it is prevented from accessing an application.

Double submission of cookies is another well-known technique to block CSRF. Much like the use of tokens, random tokens are assigned to each cookie and a request parameter. The server then verifies that the tokens match before granting entry to the software. 

Even as powerful as they are, tokens can be uncovered by several factors, which include browser records, HTTP log files, network home equipment logging the first line of an HTTP @request, and referrer headers if the protected web page links to an external URL. These potential weak spots make token solutions less than full-proof solutions. 

How to Prevent CSRF Attacks?

The primary approach to protecting against CSRF assaults is to create a way for the web utility to distinguish between legitimate requests (made on behalf of that application) and potentially malicious ones. The following two strategies are the most common:

 1.    Anti-CSRF Tokens

You send a unique token with every legit token and validate it while receiving requests. This anti-CSRF token, also referred to as a synchronizer token, is generated at the server aspect, and attackers do not have any way of understanding its correct order. The correct order is only acknowledged by the internet application and the browser. Requests dispatched as CSRF attacks will not have a legitimate token, which allows the application to ignore them as invalid, log them as attack attempts, or maybe raise the alarm.

As soon as you have generated an anti-CSRF token, it is hidden in a unique header for each request. Also, anti-CSRF tokens need to be used now for every form in the authenticated sector of the web software, as well as for unauthenticated login bureaucracy, APIs, and AJAX requests (XMLHttpRequest).

You can generate anti-CSRF tokens safely via cryptographic techniques such as Paragonie anti-CSRF for your personal home page. It is suggested that you use libraries rather than developing your own code, as it can be more susceptible to errors and harder to update.

Note: Many modern development frameworks already have synchronizer tokens built in, and their CSRF protection is often limited to HTTP methods (for requests that change the state). This means that GET requests are usually not protected. Therefore, if a developer creates state-changing features that take their entry from GET requests (not recommended in programming), these requests will no longer be protected by way of built-in CSRF safety.

2.    SameSite cookies

Another very effective way to differentiate valid requests from potentially dangerous ones is by searching at the origin of the request. You can trust the request if it comes from the same domain/website online, making it legitimate. If it comes from an external domain, it can be dangerous. You can use a particular cookie protection flag to take advantage of this technique.

Modern browsers guide the SameSite cookie attribute, which you may use when setting your consultation cookies. This may have one of three settings:

  1. Lax: a more relaxed form of cross-site request protection wherein the browser does not send cookies for pass-website subrequests.
  2. Strict: a stricter form of CSRF prevention. The browser only sends cookies in a first-party context, not with all the requests that third-party websites have initiated.
  3. None: Cookies are sent by the browser in all contexts; however, you should set the comfortable attribute to prevent the browser from blocking the cookie.

While the latest browsers set the SameSite characteristic to Lax by default for all cookies, we suggest you manually set it in your web utility (to Lax or Strict, depending on whether you need CSRF subrequests or not). 

What is Cross-Site Scripting (XSS) & How Does it Work? 

Cross-site scripting attacks – abbreviated “XSS” attacks, involve the injection of malicious code into otherwise trustworthy websites. An online scripting assault happens when cybercriminals inject malicious scripts into the focused website’s content material, which is then protected with dynamic content material introduced to the victim’s browser. The sufferer’s browser cannot understand that the malicious scripts cannot be trusted and therefore executes them. In extreme cases, you may eventually consult a QA to detect these scripts.

Cross-site scripting works by manipulating a vulnerable internet site so that it returns malicious scripts to customers. Often, this involves JavaScript; however, any purchaser-aspect language can be used. Cybercriminals target websites with prone features that are given personal input –which include seeking bars, remark boxes, or login paperwork. The criminals connect their malicious code to the pinnacle of the legitimate internet site, essentially deceiving browsers into executing their malware every time the web page is loaded.

A successful attack can have the following outcomes:

  • User files are revealed or disclosed
  • Sensitive information is made accessible
  • A malware or Trojan horse is installed in the computer
  • Online banking information is exposed
  • The HTML/DOM content is modified
  • Users are redirected to unknown and spammy websites
Cross Site Scripting Attack infographic

XSS Attack Example

The following pseudo-code can be used for displaying the last comment on a webpage, such as in a forum:


print “<html>”

     print “<h1>Most recent comment</h1>

            print database.latestComment

print “</html>

After taking this last comment, the attacker inserts it into an HTML page. Assuming that the comment is only text-based without any HTML tags, it is vulnerable to XSS, and then the attacker can submit a malicious payload in a comment. For example;


The users will be provided with this HTML code when the users will visit:


<html>

     <h1>Most recent comment</h1>

            <script>doSomethingEvil();</script>

</html>

Once the page is loaded, this malicious script is loaded in the browser of the targeted victim.

Types of XSS Attacks

1.    Reflected/Non-Persistent XSS Attacks

Non-Persistent or Reflected Cross-Site Scripting is the most common type of XSS attack. It makes use of data provided by a web client such as in HTML form submission. The server-side scripts then parse the data and display a page result for the user without sanitizing or examining the script. The script can also be delivered to the user through an email message, spam link, or other external route.

2.    Stored XSS Attacks/Persistent XSS/Type-I XSS Attacks

The malicious code is injected and permanently stored in different parts of a web application, which includes comment threads, visitor logs, forums, databases, etc. Every time a user visits such an infected website, the malicious script will be executed in the browser of the user.

The attacker will save some data in the server and display it on ‘normal’ pages without proper HTML escaping. These are much more dangerous than non-persistent or reflected XSS attacks.

3.    Blind XSS Attacks

A blind XSS attack is a hybrid XSS attack. Here, the script of the attacker is stored in the backend application. As the name suggests, Blind XSS attacks are a type of persistent attack that depends on the vulnerability of the code of the website. Login forms and forums/message boards are the most common targets of Blind XSS attacks.

4.    DOM-based XSS Attacks

Document Object Model-based – DOM-based XSS Attacks or Type-0 XSS Attacks are a unique type, wherein the webpage does not change but its code operates differently. Here, the modification occurs in the browser’s Document Object Model environment, hence the name DOM-based XSS attacks. The HTTP response is not changed, but due to modifications in the DOM, the client’s side code is executed differently.

Type-0 XSS Attacks cannot be identified without proper penetration testing. They can only be removed via client-side HTML sanitization, for which you might have to opt for outsourced QA services.

How to Prevent XSS Attacks?

To help prevent XSS attacks, you can follow the listed techniques:

1.    Keep your software updated

Outdated software cannot protect you against new types of vulnerabilities, making it prone to XSS attacks. Keep all your software always updated.

2.    Validate User Input

Screen input fields on arrival. Anything originating data externally or outside of your system should not be trusted instantly, and it should always be checked for malicious scripts. Make and use an “allow list” of data that can pass, like good input, acceptable, and known. On the output, encode data to prevent it from being interpreted as active content. You will require combinations of HTML, CSS, JavaScript, and URL encoding for this.

3.    Sanitize Data

Examine all data and remove whatever data you find unwanted, including suspicious HTML tags. From the safe data, remove unsafe characters.

4.    Use a Web Application Firewall

A web application firewall or WAF will make use of different techniques to encounter XSS attacks, SQL injection, cookie poisoning, and others. It can help prevent XSS attacks since it uses signature-based filtering to identify and block malicious requests.

5.    Use QA services

Some XSS attacks cannot be prevented by your efforts alone and, in fact, require the assistance of experts, such as for security testing. In these cases, you have to partner with quality assurance engineers and consultants to avoid high-level vulnerabilities.

Can CSRF tokens prevent XSS attacks?

You can prevent Reflected XSS attacks using a CSRF token. For other forms of XSS attacks, they are not as helpful because the vulnerabilities may exist in the application and the users will be tricked into performing a malicious action anyway.

Conclusion – CSRF vs Attacks: Should You Remain Careful?

Cyberattacks are growing increasingly common, which means you need to remain beware of the vulnerabilities existing on your site. While you may not see any major differences between CSRF and XSS or find them as threatening, it is imperative that you always remain alert and partner with credible QA services to keep protection to the fullest. 

Are you planning to create a top-quality digital solution? Talk to our experts now!

You might also like…

Automated testing is a process for validating if software is functioning well and meets adequate requirements before its launch. Though it is not superior to manual testing, it is beneficial in the sense that it gives developers more time to focus on other tasks too.

When it comes to test automation, codeless is the next big thing in this rapidly growing tech-based era. The methodologies used in software development are evolving along with the times. This new age of technology will soon be defined by codeless applications, proving accessible to users from all backgrounds, including those who are not equipped with programming and coding skills.

For obtaining quicker and more accurate results from automation testing, organizations need to use shorter iterations. This is where codeless automation, or scriptless automation, steps in. In this blog, we shall go through codeless automation meaning, its working, the benefits it poses, and the cons it can present.

What is Codeless Automation Testing?

Traditionally, test automation required writing test scripts so anyone testing the software, whether QA engineers or developers, did not have to repeat tasks manually. However, with the passage of time, we are witnessing automation and advancement in every tech field, and owing to this advancement, we are now hearing words such as low code, codeless or no code.

Codeless Automation Testing, Codeless Automated Testing, No-code Automation or Scriptless Automation are all interchangeable terms. These terms are used to refer to a type of automation testing that facilitates the rapid development of automated test scripts. This is done occasionally without writing any code and more often with record-and-playback tools. You may think of it as a helpful adaptation of automation testing that enables the creation of test scripts quickly.

Codeless testing has also become synonymous with intelligent test automation, owing to the machine learning algorithms that are utilized in this method. Many codeless automation systems offer a graphical user interface (GUI) with an integrated testing framework, allowing users to record desired actions using element locators, leading to the rapid, smooth building of test automation suites.

what is codeless automation testing

Codeless Automation Testing vs Low Code Automation Testing

Low Code Automation – as the name suggests, requires some level of coding knowledge as a prerequisite. With low code automation, you can insert code over the user interface for new or custom functionality. Product owners, product managers, business analysts, or other designated people in the project without a development background can get involved in the testing process, thereby offering input in the software development lifecycle (SDLC). They can collaborate with developers and testing engineers who are well-versed in code and the best practices in automation, to perform the automation process in a swifter manner.

Pros and Cons of Using Codeless Automation Testing Tools

Now that we know what codeless test automation is, we can proceed with exploring the benefits as well as the disadvantages of depending on codeless automation testing.

pros of codeless automation testing

Pros of Codeless Automated Testing

There are various advantages to incorporating codeless automated testing into your application testing strategy, the primary being that it speeds up the delivery of the product. Nevertheless, there are other advantages of codeless automated testing as well. The following are some of the main benefits of using a codeless test automation service:

1.    Lower Learning Curve:

Testing professionals typically go through specialized training to learn to program when they need to code their tests. Scriptless testing has made it simpler to train testers for creating automated tests without the requirement for scripting expertise. Thus, users without any coding prerequisites can start creating the test cases.

2.    Saves Resources & Reduces Scalability:

With codeless or scriptless testing, it is easier to maintain and scale test automation since it combines visible UI workflows with automation tests and current business requirements. When the system goes through test changes, it is typically not essential to fine-tune the automated flows. Additionally, automated flows can be easily combined into reusable parts that can be utilized as sub-flows for diverse test cases.

Most enterprises these days are using codeless automation testing, giving testers more time to explore application testing rather than spending hours writing code. Additionally, codeless test automation minimizes the need for developers to contribute to the development of UI tests. Since testers do not need to learn codeless testing from scratch, organizations do not need to hire new talent specifically for testing purposes. Such a setup is economical and does not put an organization under financial constraints while delivering better outcomes.

3.    Enhanced Efficiency and Scope for Automation:

Multiple sorts of applications, including desktop applications, web applications, and virtual apps, are supported by a codeless automation testing platform. Automated tests, specifically, can actively include various application interfaces. With such compliance, scaling the total level of automation from one to several apps is simple.

In contrast to code-based frameworks that call for a certain skill set to fully exploit, codeless automation technologies can be used as a comprehensive automation solution across an enterprise. This lowers a major roadblock to automation.

4.    Easy to Review:

Since test cases are developed without any code, people without a coding background can also review the test cases. The hurdle of debugging is also removed. This includes other non-technical stakeholders in the project as well.

Scriptless and codeless testing is easy to review

Cons of Codeless Automated Testing

Now that we have gone through the benefits of codeless automation testing, we can draw attention to the drawbacks posed by the medium too. The disadvantages of codeless automated testing are as follows.

1.    Customization is Not Possible:

There is little room for testers to adjust the scripts once everything is handled automatically through design. As a result, it forces testing results to rely purely on automation technologies, hence leaving little to no room for customization. This lack of customization stands as the most prominent downside of using codeless automation tools.

2.    Not Entirely Codeless:

Although the scripts are organized automatically in codeless automation testing, there may still be some requirements for manual coding. As a result, testers must be equipped with the necessary knowledge and abilities to draft simple scripts. This means some sort of prior coding knowledge is obligatory, requiring the assistance of QA engineers and developers in the project.

Hire QA engineers to help with codeless automation testing

3.    Public Availability of Product:

Today, many codeless testing solutions are available online. As a result, the developer must share the file using a common IP address to test the items using these tools. This function makes the product easily accessible to the public, posing a possible threat to the security of the product. 

4.    Unexpected Bugs & Glitches:

Even though it is computer-generated, the script may contain errors and flaws due to inadequate coverage. This could result in the recorded script playing back improperly or invalid test results if the script is reusable and modular.

Codeless Test Automation – Conclusion: To Use or Not?

We have briefly covered both the pros and cons of using codeless automation tools, making it easier for you to decide if the process is suitable for your organization. While codeless testing can help accelerate your QA procedures, it is recommended that you partner with professional QA engineers in the process to avoid unforeseen technical issues.

Are you planning to create a top-quality digital solution? Talk to our experts now!

You might also like…

If you are working in a software development organization, you must have heard quite a bit about test automation. Automation testing is a new technology in the field of software testing. It saves testers a lot of time and effort by taking care of boring, repetitive tasks. It is changing the future of manual testing by using tools and technologies to come up with the best practices for test automation that lead to products that work perfectly. Automation planning and testing help the teams improve their software quality and make the most of their testing resources. It also helps in earlier bug detection, improving the test coverage, and speeding up the testing cycle.

With automation’s fast-gaining popularity, almost every company is consulting QAs and considering diving into the sea of automation. Companies are finding that it’s more and more important to use the best QA automation tools for cost-effective automation testing and to focus on results.

Unfortunately, not all companies are getting the desired results from their automation efforts. Many people are unsure of where to begin or how far they should progress. Some people have apprehensions about automation, and their fear of failure keeps them from adopting it in their regular testing processes. Automation failure can occur for a variety of reasons, including:

  • Unclear automation scope/coverage  
  • Unstable feature/software 
  • Unavailability of automated test cases 
  • Time &  budget constraints
  • Unsuitable selection of automation tool
  • Unavailability of skilled people
  • Manual testing mindset
  • Testers unwilling to align with fast-paced technology

Things can be settled better with the right planning and good ways to carry out the plan. The same is true in automation testing, where the right decisions,  best test automation tools, approaches, and techniques can make a big difference.

Effective measures for successful Automation Testing

Here are some basic yet effective tips that you should keep in mind before moving ahead with automation testing.

1. Set Realistic Expectations from Automation Testing

The main goal of automation is to save manual testers’ time and help them test quickly, efficiently, and effectively. However, automation is not supposed to find out flaws in test designs, test development, planning, or execution. Don’t expect automation to find extra bugs you didn’t define in your test automation script. Accept the fact that automation is not a replacement for manual testers; it is here to provide confidence to the stakeholders that features are working as expected across builds and nothing is broken.

2. Identify your Target Modules

“If you automate a mess, you get an automated mess.” (Rod Michael).”

Thinking about automating the overall project is not a good approach. It’s always smart to be concise, use a risk-based approach to analyze the project scope, and then decide on test coverage. Here are a few things to keep in mind:

  • Always pick the stable area, and no major changes are expected in the future.
  • Pick tasks that consume much of the tester’s time in performance, regressions, load, and security.
  • Features that are in early development should not be your choice for a QA automation tester.
  • Don’t consider automating the UI that is going to undergo massive changes and keep the usability testing process separate.
  • Make sure you have a collection of stable test cases run by manual testers. Once manual testers mark the test cases stable/approved, you should proceed with the test automation.

3. Pick the Right Test Cases to Automate

Always start with the Smoketest cases of the identified module. Next, move on to repeated tasks like Regression Test Suite, tasks that can experience human errors like heavy computations, and test cases that can introduce high-risk conditions. This is how the priority should be set for automation. You can also add data-driven, lengthy forms and configuration test cases that will run on different devices, browsers, and platforms.

4. Allocate Precise Budget and Resources

During automation, time, budget, and availability of skilled and trained automation resources are a big challenge. To cater to this, always choose automation for those projects that don’t have time constraints and tough deadlines. Ideally, choose automation for long-term projects. Your target projects should have enough budget in terms of resources so you can easily hire trained and skilled people. For resources, you should consider the following:

  • Assign automation duties to specific resources who possess sound knowledge of any programming language and are well aware of automation standards, strategies, frameworks, tools, techniques, and analytical skills.
  • Open to challenges and has strong problem-solving and analytical skills.
  • If someone from the manual team is willing to perform automation, then proper training should be provided, and manual duties should be removed from that resource.

5. Pick the Right Tools for Automation

The nature of the platform (mobile, OS, web) should influence tool selection. In an ideal world, a tool should be in the same language as the application so that help can be found within it. The tool you choose should also have support. Price is another factor to consider, whether the tool is open source or licensed. Think about how well the tool can work with other tools, such as JIRA or TestRail. You should prefer those tools that require a flatter learning curve and are easy to use. The team should be able to adopt that new tool and easily work on that, like in codeless automation.

6. Estimate Automation Efforts Correctly

You can’t say that you can automate an average of 50 cases in 5 hours because each case will differ in logic, complexity, and size. Always provide estimates in effort or hours against each case, or the most appropriate way is to provide consolidated estimates feature-wise. For example, if there are two features, signup, and login, then provide the average time for both features separately.

7. Capitalize on the Learning Opportunity in Automation

Consider automation a growth and skills development opportunity for both organizational and individual levels. Accept the challenges and issues that you faced during automation as a learning point and try to fix them. Automation will help you improve your work, make you more marketable, and raise your worth and standard.

8. Make Automation a Part of CI/CD

CI/CD is used to speed up the delivery of applications. For continuous testing, you should set up a pipeline for automated test execution. When developers merge code from different branches into one, they test the changes by making a build and running automated tests against it. By doing so, you avoid integration conflicts between branches. Continuous integration emphasizes test automation to check that the application is not broken whenever new commits are integrated into the main branch. Here are some best practices to follow:

  • Your automation code is aligned with the stable branch in which developers are going to merge their changes.
  • Set up execution email during configuration, which will be received at the end of each execution. 
  • Keep an eye on the results in case of build failure/conflicts with your automation test cases.
  • Once the status of test cases is passed, the build should deploy to production.

9. Implement the Best Coding Practices for UI & Functional Test Automation

Aside from the above, there are a few other important things to think about when automating because we need to follow international coding standards.

  • Make full use of version control software. Don’t keep the code locally. Always push your code even if you made a one-line change.
  • Remove unnecessary files/code from your automation project.
  • Remove unnecessary comments from your code.
  • Use boundary value analysis, equivalence partitioning, and state transition techniques in your automation.
  • Have a separate testing environment for automation.
  • Follow the best coding practices of the chosen programming language.
  • Always use dynamic values and avoid using static data and values in your code.
  • Use implicit wait instead of explicit wait to boost efficiency. 
  • Implement a reporting mechanism to have an execution report at the end of every execution cycle.
  • Capture screenshots in case of failure for failure investigation.
  • Log bugs on JIRA, TFS, and teamwork.
  • Write code that is reusable and easy to understand.
  • Refrain from writing too much code in a single function; use the concept of high and low-level functions.
  • A Senior Automation tester/Developer should review your code.
  • Use a page object model where you will define your functions in one file and test cases in another file.
  • Make sure your code is clean, readable, and maintainable.

Advantages of Using the Best Practices in Automation Testing

Using these best practices for automated testing will help you increase the number of test cases that are covered, make the testing process quick, easy, and convenient, and keep your code easy to maintain. It’s also cheap and lasts a long time, and it will keep your automation testing for any applications or projects safe for the future. This will help boost productivity, save time and money, and enhance your skill set.

In The End

Automation is not rocket science. It’s just a matter of following the proper techniques and approaches. All you need to do is some brainstorming on the best strategy, some R&D on tool selection, identification of your team’s skills, and definition of your project scope, and then just start the automation. You will soon begin to see why automation testing is all the rage in this day and age. The one-time-right investment in automation (time, resources, and budget) will save you from many hurdles in the future.

FAQs For Test Automation Best Practices

Good coding practices while automation includes a series of things, like removing unnecessary codes and comments from your project, having separate testing environments, capturing screenshots whenever you detect a failure, and more.

Some of the key factors while conducting advanced text and automation start from setting realistic expectations, picking the right cases, the right tool. Allocating the best budget and selecting the best team to conduct all these testings.


Quality AssuranceTechnologyTest Automation

Planning to create a top-quality digital solution? Talk to our experts now!

You might also like…

Automated software testing is all the rage in the industry and for good reason. Although manual testing is still in place in many technology companies, many fast-growing organizations have adopted QA automation testing to speed up processes, redirect manual efforts and minimize the chances of error. 

It is quite common for businesses to outsource the quality assurance processes of their software development cycle. It saves them time, cost, and resources.

This means it is essential for technology organizations like ours that offer software quality assurance services, to adopt automation, one of the most accurate, efficient, and reliable approaches to quality assurance. In this article, I’ll talk about how the QA team at VentureDive carried out automation testing for the Muslims App. It is a community engagement app by IslamicFinder that aims to unite Muslims around the world through a single platform, offering networking, knowledge sharing, and learning.

Let’s dive in! 

How did we manage before QA automation?

Muslims is a hybrid mobile application developed in React Native. It has the same code hierarchy for both the Android and iOS platforms. This means we have the same code base for QA automation as well.

While the app was in the development phase and new features were getting continuously integrated, we were carrying out manual quality assurance side by side. The process was consuming a lot of effort. Since every issue was reported, the QA team had to dig down into the apps, again and again, to ensure that the overall performance of the apps remains optimal. Every time an issue was reported or any new build was shared with the QA team, they had to go through all the features of the app, which made quality testing a tedious and time-consuming process. 

In short, we dreaded it! 

As the application got bigger and more complex with every sprint, more issues popped up that needed fixing. This meant it was no longer possible for us to test everything over and over again. Therefore, we decided to create and implement an efficient testing process to reduce the testing efforts of the team as well as enhance the overall quality of the apps.

Enter: a hybrid automation system for mobile apps on both the iOS and Android platforms. 

QA automation covers a lot of things we previously had to do manually and repeatedly. It took on the menial and repetitive tasks for us, delivered better testing quality with minimal chances of error, and helped deploy high-quality, bug-free apps. Our automation engineers developed the QA automation process for hybrid apps so we could test each feature more thoroughly, using both manual and automated systems, and deliver a seamless product to the users.

Why did we decide to automate the Muslims app?

The thought process behind automating the Muslims app was that we wanted to reduce the overall testing time of the app on both the Android and iOS platforms. The idea was to automate the testing of any feature being developed. Over time, this would enable us to have a full-fledged testing process in place that would streamline quality assurance efforts, reduce time and cost spent, and deliver efficient and high-quality apps to customers within record time.

The whole QA automation team brainstormed a lot on how to automate the hybrid application for Muslims. We discussed different technology stacks and their pros and cons with the goal to increase the overall quality and performance of the app through a smooth QA automation process.

Why did we use the same codebase for Automation?

We used the same code base for the Muslims app automation because we were developing a hybrid framework, and a single code base meant fewer changes in the automation framework. Whenever there is a change in the application hierarchy, the same code base means reduced development effort in the hybrid framework. Here’s a resource to help you understand the difference between hybrid and native applications, and which might be a better choice for your project.

To make life easier for automation engineers, we can reuse this QA automation framework for any hybrid app developed in react-native as well as native apps. This would make managing the code base simpler, with lesser changes and easy integration of new features within the automation framework.

What technology did we use for QA automation?

Our QA automation engineers adopted WebDriverIO, a tool that allows you to automate any application written with modern web frameworks such as React, Angular, Polymer, or Vue.js, as well as, native and hybrid mobile applications for Android and iOS.

Using WebDriverIO, we can easily develop any web or mobile automation framework, thanks to its exciting feature set and valuable plugins. Its libraries are easily available and can be integrated with the framework quickly, so it saves a lot of time for automation engineers.

Many technology companies choose to go with Selenium WebDriver, another tool used for automating browser testing. We used WebDriverIO and Javascript to create automation scripts for the Muslims app, which included the integration of unit test frameworks such as Mocha and Chai, the assertion library.

However, we chose WebDriverIO over Selenium because of a multitude of technical reasons: 

  • WebDriverIO libraries are wrappers of selenium libraries as these are developed on top of selenium libraries – it provides faster execution than using Selenium APIs with Appium, a test automation framework. 
  • WebDriverIO provides a runner class where we can define all the necessary prerequisites, which makes it easier to configure the execution of automation scripts. Whereas, we have to write a lot of lines of code to set up the configuration process of Selenium with Appium.
  • WebDriverIO has its own Appium service so it takes only a few minutes to configure Appium with it.
Automated test scripts

Using a hybrid automation framework like WebDriverIO has many advantages. For instance, a one-page object class is developed for both the Android and iOS platforms, which means we do not need to create a separate repository for each platform. A generic helper class package is also created to reuse the utilities within the project and we can use this framework with any project in the future if we want to develop a framework for hybrid and native apps.

Wrapping Up: QA Automation of the Muslims App

For the QA automation of hybrid apps, you can quickly develop an automation framework with WebDriverIO and Appium, as they provide a lot of flexibility in the development, structuring, and maintenance of the codebase. Using these frameworks requires expertise in JavaScript and Node.js, which means some prior experience in both is needed. You can choose to consult a QA services company before making a decision. However, if you have used Selenium with Appium, it will be easier for you to switch to these Javascript frameworks. According to our experience, if you are developing your own hybrid application, it is worth trying WebDriverIO too.


QA AutomationQuality Assurance

Are you planning to create a top-quality digital solution? Talk to our experts now!

You might also like…